All In One: Hotspot, Link, Gateway, Repeater with many useful functions
DV Development Group
www.dvrptr.de
Version 0.1 - pre release
Author english verison DJ0ABR
What you can do with this board and software:
With this solution you can build an access to the DV system either as your personal DV access at home, or as a public repeater. It offers a couple of operating modes which fits all needs for comfortable DV operation. Using your DV Transceiver you can talk through this equipment to the world wide DV network.
Physical Setup:
You need these components:
The components are connected like that:
Antenna <--> FM-Transceiver <--> DVRPTR-Board <---> PC running Control Center <--> DSL Internet Access
Operating Modes:
| personal HotSpot (Hotspot mode) | use this Hotspot at any place where you have access to the
internet (even through mobil phones - i.e. UMTS) and you can use your DV
transceiver to talk through your hotspot with other DV stations.
This is a simplex solution, you can talk and receive, but not at the same time. An ideal solution for holiday locations. For this personal Hotspot you use your own private call sign. Since your private callsign is not allowed for automatic stations, you have to be close to your Hotspot. A dummyload as antenna is recommended which gives you an operating range good enough for your living room and a bit more. |
| public HotSpot (simplex link) | works technically like the personal Hotspot, but you use a callsign exclusively registered for this Hotspot by your local authorities. This will usually be a repeater callsign. In this case you may use a good antenna and the legal power as written in your licence. |
| Gateway Link | If you don't have an internet access at the location of your
repeater (i.e. on top of a high mountain), you can setup a second DVRPTR
and run it in Gateway mode. In this mode the Gateway-DVRPTR sends and
receives DV data to the uphill repeater at the normal QRGs. This is
a very simple solution to bring DV to a distant DVRPTR repeater.
When you apply for your repeater's callsign, please take care that possibly two different locations must be registered for one repeater callsign, one for the repeater and the second for the Gateway. |
| Repeater | In this mode the DVRPTR works as a usual repeater. Two FM-Transceivers and a good duplexer are required since it receives and sends simultaneously. |
System requirements:
Hardware, Connections:
The DVRPTR board has a 6 pin Mini-DIN jack which is pin compatible with the 9k6 connectors of most transceivers. Using the included cable connect the DVRPTR with the transceiver.
Connect the USB interface on the DVRPTR with an USB connector of your PC. Please make sure that always the same connector is used on the PC, this makes the software setup easier.
Please check if your FM transceiver is set to 9k6 operation, see the transceiver's manual for details.
In Hotspot mode set the FM transceiver to a frequency which is recommended for DV, see the band plan, or use the frequency shown in the license if you have got one. Set the transceiver to simplex, TX and RX on the samen frequency.
In Gateway mode activate the repeater shift in your transceiver. The frequencies and shift of your FM transceiver is set exactly in the same way as in your DV transceiver.
In Repeater mode you use two separate transceivers, one only for transmisson and the second for reception. Since RX and TX is done simultaneously a good duplexer (>90dB is recommended) to feed RX and TX to the same antenna.
Installing the software:
First of all the Windows driver for the DVRPTR must be installed. Please go through the following steps:
The actual version of the DVRPTR Control Center Software can be found in the files section of the Yahoo group DVRPTR: http://tech.groups.yahoo.com/group/DVRPTR/
(the preview version does not need a driver or installation, it can be started directly)
After downloading the software unzip it and run the DVRPTR.exe file. Follow the instructions on the screen and wait until the software is installed.
Then start the DVRPTR Control Center and continue with the following setup.
Using the DVRPTR Control Center:
The software has a couple of tabs which show the corresponding windows:
![]()
Click on the tabs to show the window.
There are two tabs which needs to be modified before oeration of the DVRPTR: System and Modem.
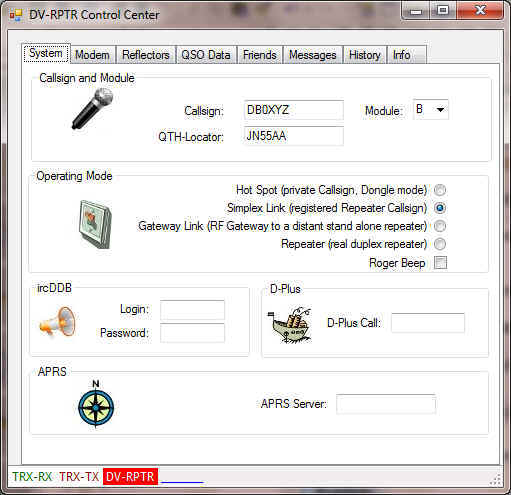
System:
The "System" window includes all settings required for DV operation, like callsigns and others. Here is the detailed description:
Callsign Your private callsign in Hot Spot mode, or an official registered callsign in all other modes Module the module describing the band (A=23cm , B=70cm , C=2m) where the DVRPTR is working QTH-Locator the maidenhead QTH locator where this station is located Operating Mode Select one of the 4 operating modes. Private persons always use the first mode "Hot Spot", the other modes are for registered repeater callsigns only. Roger Beep if selected, the DVRPTR sends a "beep" when a transmission is finished ircDDB login login name which you got from your ircDDB registration. If you are not registered, then leave this field clear. ircDDB Passw. Password which you got from your ircDDB registration. If you are not registered, then leave this field clear. D-Plus Call: the connection to the D-Plus network is always done as a "Dongle-User". You must be registered at D-Plus. Then enter your registered callsign here. Even if you use an official repeater callsign, the D-Plus callsign must always be a private and D-Plus registered callsign. APRS Server enter the web address of the APRS server, or keep the default server
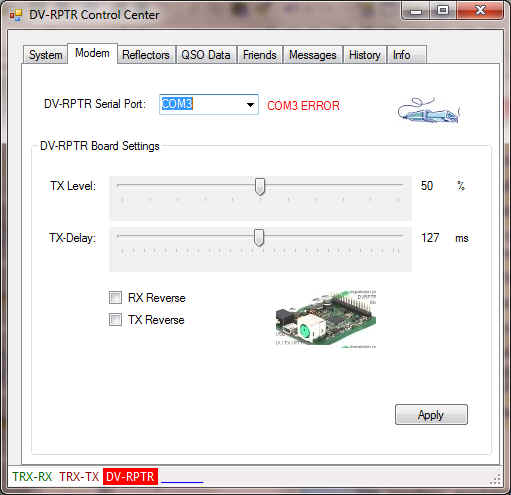
Modem:
The "modem" window has all settings required for the DVRPTR hardware and connection to the PC and transceiver
Serial Port the DVRPTR uses a virtual serial port for the USB connection. The port number is shown in Windows. In Windows XP go to the hardware manager, look for the Serial Ports and read the COM port number. In Windows 7 go to "Devices and Printers" to find the COM number. Then select this number here. If the software displays COMx ERROR, then the number is wrong or the driver not installed. The screen must show in green letters COMx open. The DV-RPTR sign in the status line will change to green if the DVRPTR board is found.
TX-Level The output level of the DVRPTR can be set to a very wide range of levels which should fit to almost every FM transceiver. Use 50 as a good starting value. Later, when you receive voice from a reflector, you can fine adjust this value. See Adjusting the TX-Level below. (Click "Apply" to activate this setting) TX-Delay should be as short as possible. Set it to about 100ms as a good starting point. Later you can reduce this value as low as the transmission still works, then double this value to have some reserve. (Click "Apply" to activate this setting) RX Reverse DV needs the right signal polarity to work correctly. If the DVRPTR cannot detect the DV transmission from your DV transceiver then try to reverse the RX. (Click "Apply" to activate this setting) TX Reverse same as RX Reverse but for the transmission side. If you cannot hear the DVRPTR in your DV transceiver then try to revers TX. (Click "Apply" to activate this setting)
Adjusting the TX-Level:
this is the easiest and best method to set the TX level:
- connect to a reflector and listen to a QSO
- monitor the transmission of the DVRPTR using a separate FM transceiver. Listen to the usual DV humming.
- Use another DV transceiver and also listen to this DV humming.
- Compare the FM sound of the DV transceiver with the sound of the DVRPTR
- set the TX level that both sound similar. An approximate setting is good enough, no need for precise setting.
Adjusting the TX-Level:
RX does not need level adjustment. The DVRPTR board detects a wide range of voltage levels. The signal from the 9k6 jack of your FM transceiver to the DVRPTR board should be in the range of 0,5Vpp to 2,5Vpp for best performance.
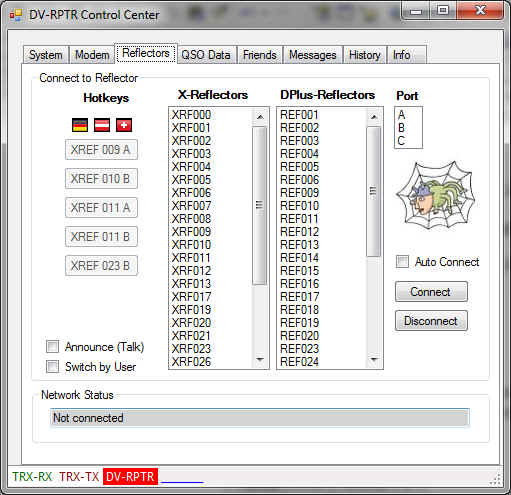
Working with Reflectors:
this window allows the connection to X-Reflectors or D-Plus Reflectors.
To work with reflectors you have to open two port numbers in your DSL router:
Route port 30001 - UDP and 20001 - UDP to the IP address of the PC running this software. Without these settings in your router you will not be able to work with reflectors.
If you use ircDDB callsign routing then you must also route port 40000 TCP/UDP to your PC running DVRPTR.
Connecting an X-Reflector:
Choose one of the X-Reflectors from the table. Choose the Reflector Port A, B or C.
Then click "Connect". If the Reflector is available then the "Network Status" will show a green text Connected to XRF...
Connecting a D-Plus Reflector:
Choose one of the D-Plus-Reflectors from the table. Choose the Reflector Port A, B or C.
Then click "Connect". If the Reflector is available then the "Network Status" will show a green text Connected to REF...
The status line will also show the connected reflector.
Disconnecting from a Reflector:
Clicking "Disconnect" immediately disconnects you from a reflector
Auto Connect:
The connection to a reflector can be disconnected if the internet is slow or any other failure happens. If you activate "Auto Connect" then the reflector will be automatically reconnected after a failure.
Hotkeys:
Pressing one of the hot keys immediately connects to a reflector. This is the same as selecting it from the list, and it is just for convenience.
Announce (voice):
if "Announce (voice)" is selected, then the DVRPTR talks a connection or disconnection message which can be heard in your DV transceiver. See the description of the "Messages" tab to find out how these messages can be personalized.
Switch by User:
if this box is selected, then a normal user can connect to a reflector and disconnect from a reflector with the transceiver.
The usual commands are used, enter these information into the URCALL field of the transceiver and push the PTT to send the command to the DVRPTR Control Center.
XRF010BL connects to X-Reflector XRF010 Module B (the Module is the 6th character, the 'L' link command ist the 7th character. REF006CL connects to DPlus-Reflector REF006 Module C (the Module is the 6th character, the 'L' link command ist the 7th character. ________U disconnect (characters 1-7 are blank spaces, character number 8 is 'U') ________Z ask for the connection status (characters 1-7 are blank spaces, character number 8 is 'Z') if the user is allowed to connect/disconnect a reflector then it is recommend also to activate "Announce (voice)" to give a feedback to the user.
QSO data:
this window shows information about the actual activity and the operators.
from Reflector:
the blue line shows the last heard station on the reflector. The lines below show a history of the last 4 stations.
from TRX:
the blue line shows the last heard station on RF. The lines below show a history of the last 4 stations.
Last Message and GPS Data:
Message The TX message of the last heard station Latitude, Longitude Position of the last station sending GPS data QTH-Loc QTH-Locator of the last station sending GPS data Distance to Call Distance from the last heard station to this DVRPTR location. QSO distance Distance between the last two stations sending GPS data. The distance of a QSO can be found here if both stations are sending their position.
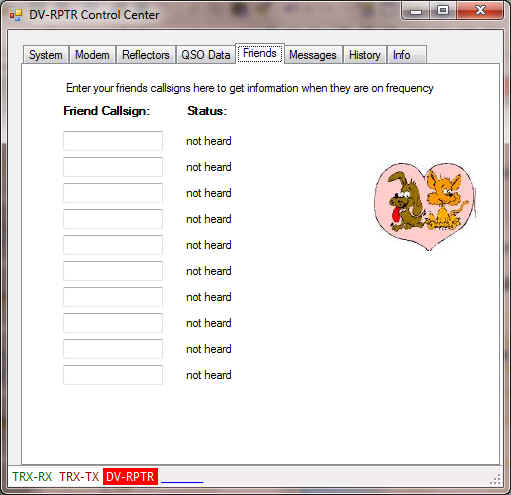
Friend Finder:
This windows lets you look for your friends:
enter up to 10 callsigns of your friends here.
This window will show you when these stations were heard.
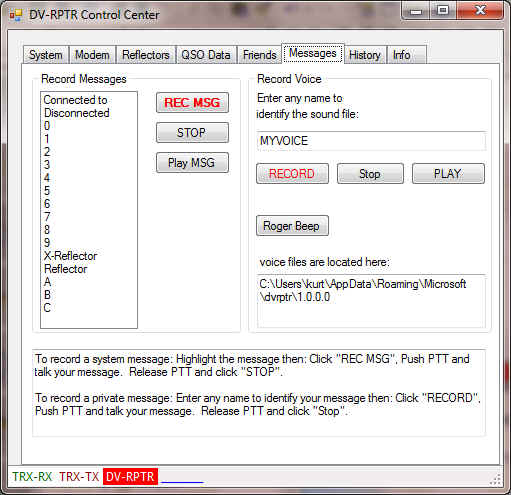
Voice Messages:
In this window you can manage, record and playback voice and messages.
Record Messages:
the list shows all messages used to announce reflector connections and disconnections.
You can record your own voice here in your own language, dialect or maybe another erotic voice.
Each message must be recorded separately. The software will then combine the single messages to build a complete announcement.
How to record a message:
Always use this same sequence:
- select the message to be recorded
- click "REC MSG", no need to hurry, take your time and when you are ready continue:
- grasp for breath, press the PTT and wait about 1/2 second
- now talk your message into your DV transceiver and immediately
- release the PTT
- click "STOP"
Now click "Play MSG" to hear if the record was ok. Repeat the recording if you want, or continue with the next message.
When all messages are recorded then connect to a reflector and hear if you like your announcement.
RECORD VOICE:
Here you can record an almost unlimited number of voice or sound files.
Enter the name of your message and use "Record", "Stop", and "Play" to record and playback your voice message. Use the same sequence as described for the messages above.
A possible use of these messages is i.e. a CQ call or a description of your station or anything else.
Roger Beep:
Clicking this button just generates a beep in your DV transceiver.
Voice files are located here:
starting with Vista and continuing with Windows 7, Microsoft makes a big secret where user files are stored. To let you find your voice files easily this box displays the path on your hard drive where these files are located.
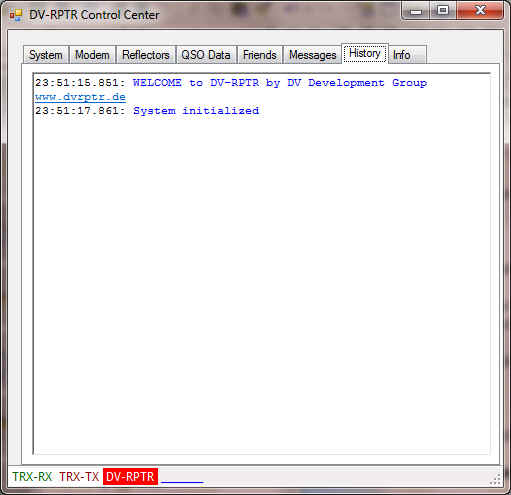
History:
This window simply shows some interesting activities of the DVRPTR together with a time stamp.
If you have comments or bug reports please post them in the Yahoo group DVRPTR only. Please do not send personal e-mails to our developers. Thank you.